It feels like just yesterday that we were talking about all the sweet combos in Hour of Devastation! Now that Ixalan has arrived, it’s time to explore Magic’s newest set, looking for broken interactions, and vacation homes in Magical-Christmas-Land!
For the uninitiated, every set I write an article about some of my favorite card interactions. I typically try to focus on card combinations that can win the game, or that can be repeated infinitely (an arbitrary number of times, to be precise). All of the combos in this article will be based on one (or more) new cards from Ixalan. As I always like to say, when doing combos in game with variance, like Magic, your mileage may vary — no refunds will be issued. All right, combo lovers, get hyped!
Axis of Mortality + Phyrexian Unlife + Ad Nauseam
 | 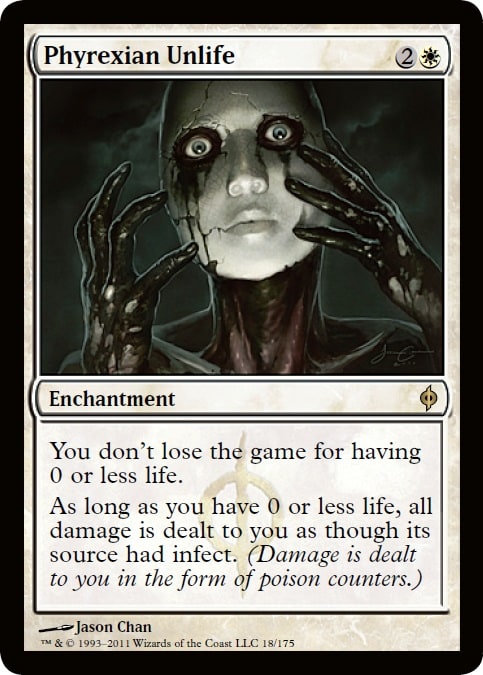 | 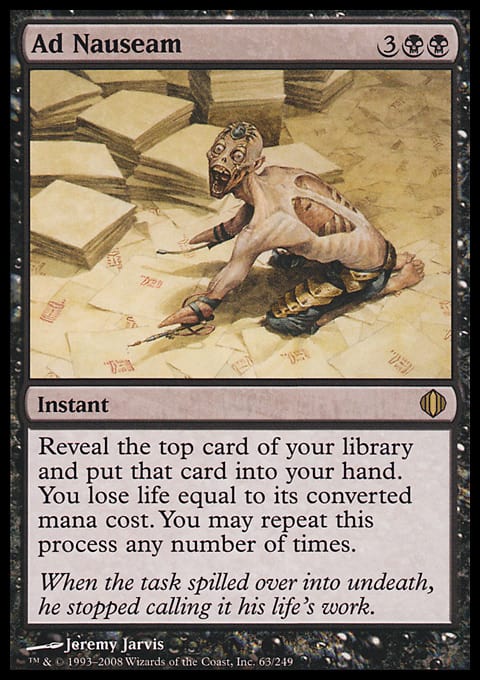 |
Result: Swap life totals with another player. Oh, and your life total is zero by the way.
Key Rules Text:
Axis of Mortality — At the beginning of your upkeep, you may have two target players exchange life totals.
Phyrexian Unlife — You don't lose the game for having 0 or less life.
Ad Nauseam — Reveal the top card of your library and put that card into your hand. You lose life equal to its converted mana cost. You may repeat this process any number of times.
Setup and Execution:
There are a few options for setting up this combo depending on which format you prefer. I’ll start with a Modern version, because there’s already a Phyrexian Unlife / Ad Nauseam deck which would make a good home for this combo. This deck typically uses Laboratory Maniac as the win condition, but Axis of Mortality is a bit spicier — it’s also new and shiny.
Step one is to bring your life total to zero — how awesome is that!? You accomplish this by having Phyrexian Unlife in play and using Ad Nauseam (or Spoils of the Vault). Once your life total is zero, you’ll need to play Axis of Mortality. You can play it before reducing your life, but it’s more likely that you’ll use a card like Ad Nauseam to find it. With your life at zero, and Axis of Mortality in play, you’ve done all you can do. Now you pass the turn, and hope that the fates deliver you and your combo safely to your next upkeep. Cards like Pact of Negation, or Misdirection can help that bring that to fruition.
For my Commander lovers out there, this combo is even more efficient! Instead of spells like Ad Nauseam, or Spoils of the Vault you get the upgrade of Necropotence. This whole setup can be put onto the battlefield with a timely Replenish, and while we are bringing a bunch of enchantments onto the battlefield, why not include this one?

That’s right! With Paradox Haze in play, you can double your upkeeps meaning you reduce two players life totals to zero — you just need to be sure to use Necropotence between your upkeeps. Keep in mind, with Necropotence you can only draw card until you have zero life.
Bellowing Aegisaur + Triskelion + Darksteel Plate
 | 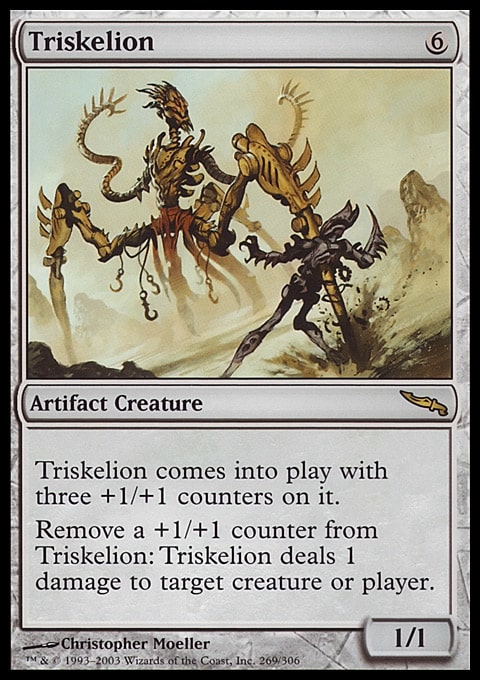 |  |
Result: Arbitrarily Large Creatures!
Key Rules Text:
Triskelion — Remove a +1/+1 counter from Triskelion: Triskelion deals 1 damage to target creature or player.
Darksteel Plate — Equipped creature has indestructible.
Setup and Execution:
The new Enrage mechanic makes room some gnarly tricks. In this case, the trick is centered around giving Bellowing Aegisaur indestructible with Darksteel Plate. Once your dino is indestructible, you can damage it at will, triggering its ability to put a +1/+1 counters on all your creatures. If you have Triskelion in play, then you can use Triskelion’s ability to repeatedly deal one damage to Bellowing Aegisaur. This will trigger the Aegisaur’s ability creating a loop and enabling you to stack copious amounts of +1/+1 counters on your creatures.
When you can build enormous creatures it’s not uncommon to try to win by attacking, and that’s a fine plan. But, since we’re stacking +1/+1 counters, why not look at some different angels? For example, if we throw Hardened Scales into the mix you can net a +1/+1 on Triskelion, then peel those off in the direction of your opponents. Or, how about playing a Sage of Hours for infinite turns?
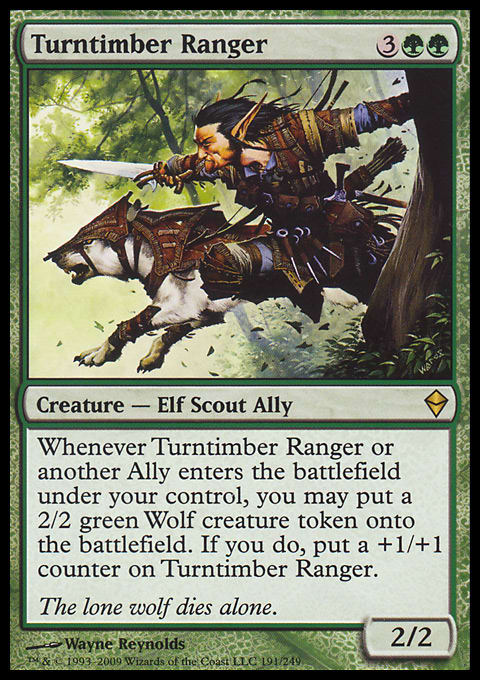
Arcane Adaptation + Turntimber Ranger
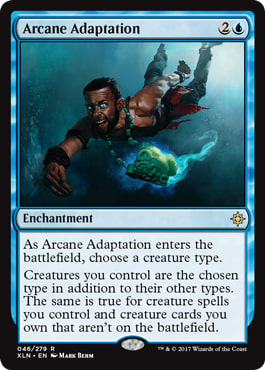 |  |
Result: One million wolves!
Key Rules Text:
Creatures you control are the chosen type in addition to their other types. The same is true for creature spells you control and creature cards you own that aren't on the battlefield.
Turntimber Ranger — Whenever Turntimber Ranger or another Ally enters the battlefield under your control, you may create a 2/2 Green Wolf creature token. If you do, put a +1/+1 counter on Turntimber Ranger.
Setup and Execution:
Arcane Adaptation is one of the cheapest effects of its kind. Previously you can find effects like this in the card Conspiracy or Xenograft at five mana. Having Arcane Adaptation at 3 managives us the opportunity to curve intoTurntimber Ranger — playing Arcane Adaptation on turn three or four, and Turntimber Ranger on turn five. The key to this combo is naming “Ally” when Arcane Adaptation enters the battlefield. Once you have Arcane Adaptation in play naming Allies, then you can play Turntimber Ranger. When the ranger comes into play, his ability will trigger, creating a 2/2 Green Wolf creature token. Thanks to Arcane Adaptation your Wolves are also Allies, which means they will trigger Turntimber Ranger’s ability again. This loop will repeat until your one-man wolf pack has turned into a massive wolf army (and an arbitrarily large Turntimber Ranger). Now you’re just one Concordant Crossroads away from releasing the wolves on your opponent’s life total(s)!
As you’ll read later, there are some ways to abuse “infinite” creatures, or enter the battlefield triggers, but since we’re dealing with allies, let’s stay in flavor. You can use any of the allies below to get more than just wolves out of this combo.
Ondu Cleric — Gain one million life.
Kalastria Healer — Both of the above.
Bala Ged Thief — Discard your opponent’s hand(s).
Halimar Excavator — Mill your opponent’s deck(s).
Speaking of milling people. Let’s look at the combo that I’ve affectionately named the “Fish Slap”.
Fleet Swallower + Fraying Sanity
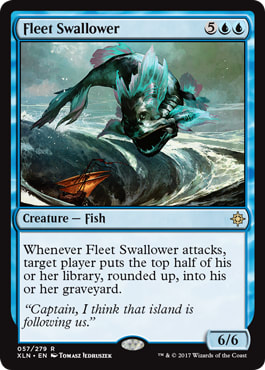 |  |
Result: Mill one player's entire library.
Key Rules Text:
Fraying Sanity — At the beginning of each end step, enchanted player puts the top X cards of his or her library into his or her graveyard, where X is the number of cards put into that graveyard from anywhere this turn.
Setup and Execution:
The thing that I like about this combo is that you only need to attack with Fleet Swallower to trigger the ability. You don’t need to deal combat damage. After you attack with Fleet Swallower, if you end the turn with Fraying Sanity in play, it’s ability will trigger and the defending player will mill the other half of their library. This is a fun Mono-Blue combo in Standard, but if you want to stray from the Standard card pool you can introduce some shenanigans with this guy.

Volrath's Shapeshifter keeps the combo Mono-Blue, and gives you a significant discount on casting the seven-mana Fleet Swallower! Shapeshifter also allows you to spring the mill-attack on an unsuspecting opponent. You can go from having an innocuous 0/1 in play, to milling someone’s entire deck, by discarding Fleet Swallower then attacking, and then playing Fraying Sanity. FISH SLAPPED!
Jace, Cunning Castaway + Doubling Season
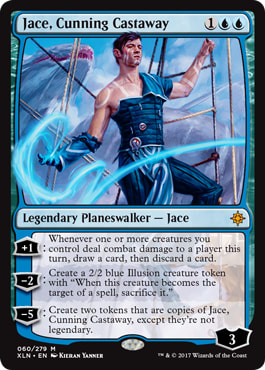 | 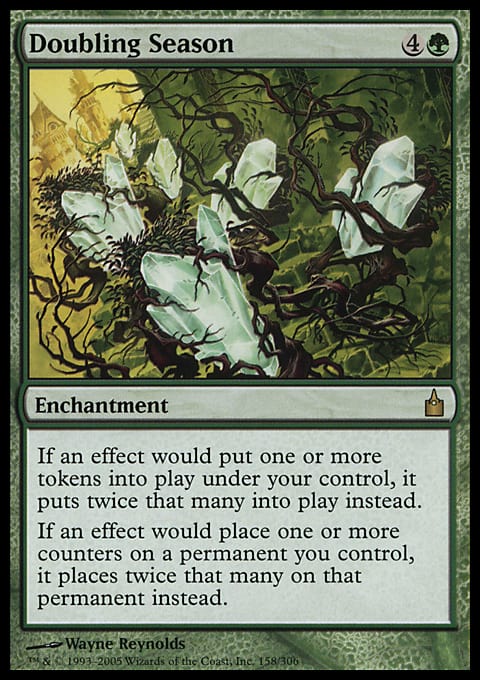 |
Result: Many, many, many, Jaces!
Key Rules Text:
If an effect would put one or more counters on a permanent you control, it puts twice that many of those counters on that permanent instead.
Jace, Cunning Castaway — (-5) Create two tokens that are copies of Jace, Cunning Castaway, except they're not legendary.
Setup and Execution:
This is one of the strangest, and most hilarious combos to come out of Ixalan! The combo centers around Doubling Season and making Jace, Cunning Castaway tokens. When you play Jace, Cunning Castaway with Doubling Season on the battlefield, Jace will enter with double his loyalty counters (six). This will allow you to immediately use Jace’s ultimate ability and create two Jace, Cunning Castaway tokens. Since you have Doubling Season in play, you’ll actually create four Jace tokens. For every Jace token you make, it had the ability to make 4 addition tokens. You can probably see where this is going.

From this position, you can create as many Jace, Cunning Castaway tokens as you like. Once you have the requisite number of Jace tokens, you’ll need to choose how to win. If you have a haste enabler (like Mass Hysteria, Concordant Crossroads, or Anger), you can use the non-ultimated Jace tokens to create 2/2 Illusion tokens, and attack with one thousand 2/2s. If you don’t like attacking you can also use a card like Goblin Bombardment, Purphoros, God of the Forge, or Altar of the Brood to leverage making a ton of 2/2 illusions. Finally, if you have access to Laboratory Maniac, and a creature with a clear path to deal combat damage, then you can use a hundred or so instances of Jace’s first ability on your battle-ready creature to win the game via Laboratory Maniac’s ability. All right, I could go on but I think we should move on instead. Let’s talk Dinosaurs again!
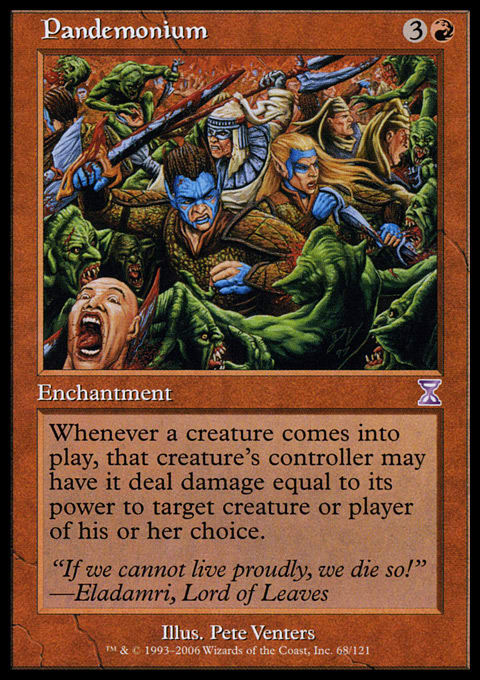
Raptor Hatchling + Darksteel Plate + Pandemonium
 | |  |
Result: A dino stampede of Jurassic proportions.
Key Rules Text:
Darksteel Plate — Equipped creature has indestructible.
Pandemonium — Whenever a creature enters the battlefield, that creature's controller may have it deal damage equal to its power to target creature or player of his or her choice.
Setup and Execution:
Raptor Hatchling is a little dinosaur with big potential. Typically, his one toughness would make for an unexciting exchange in combat, but when coupled with Darksteel Plate he becomes a dino-making-machine. By making Raptor Hatchling indestructible we can deal as much damage to it that we like, and get herd of trampling 3/3’s for our trouble. There are a wide variety of ways get this cycle going, but one of the most efficient is by using the card Pandemonium. As your newly created dinosaur enters the battlefield, it will trigger Pandemonium and you can aim the damage at Raptor Hatchling. This will create another 3/3 triggering Pandemonium again, and you’re off to the races! Keep in mind, that to start this cycle, you need to deal at least one damage to the Raptor Hatchling after equipping the Darksteel Plate. You can do this by putting a creature in play while Pandemonium is on the battlefield, or using a creature that deals damage like Goblin Sharpshooter.
Once you have a herd of dinosaurs, you can employ some of the haste enablers mentioned above (Anger, Mass Hysteria, or Concordant Crossroads). Or you can use Goblin Bombardment to deal damage directly to your opponents. There are many other options for ending the game from this position. One of my go-tos is Blood Artist and Phyrexian Altar — generating gobs of mana and draining your opponents by sacrificing your dinos. Speaking of sacrificing creatures, let’s finish with a couple of Reveillark combos.
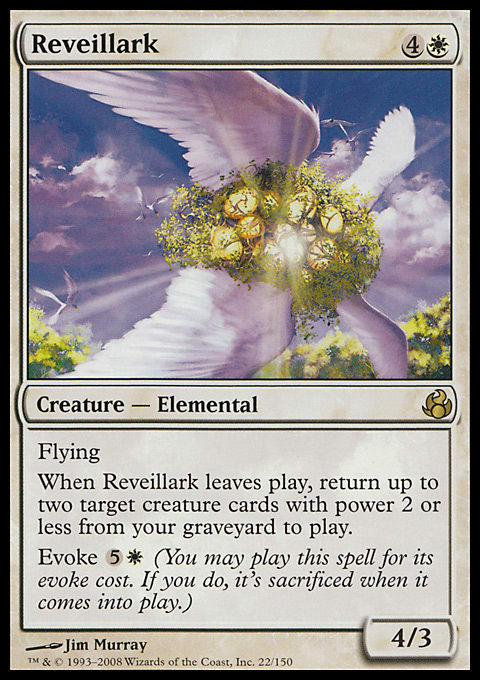
Skymarch Bloodletter + Karmic Guide + Reveillark + Viscera Seer
 |  |
 |  |
Result: Suck the life from your opponent’s, vampire style.
Key Rules Text:
Karmic Guide — When Karmic Guide enters the battlefield, return target creature card from your graveyard to the battlefield.
Reveillark — When Reveillark leaves the battlefield, return up to two target creature cards with power 2 or less from your graveyard to the battlefield.
Viscera Seer — Sacrifice a creature: Scry 1.
Setup and Execution:
This is an old combo that can be found in some ![]()
![]() Commander decks. Because of the Commander color restrictions, Orzhov decks cannot use the typical game ender; Murderous Redcap. Instead they hand the ball to the third-string quarterback — Highway Robber. Ixalan brings an upgrade in Skymarch Bloodletter sporting: flying, a 1-mana discount, and the fancy Vampire creature type. Now Vampire decks can rock this combo with a Vampire as the game ender!
Commander decks. Because of the Commander color restrictions, Orzhov decks cannot use the typical game ender; Murderous Redcap. Instead they hand the ball to the third-string quarterback — Highway Robber. Ixalan brings an upgrade in Skymarch Bloodletter sporting: flying, a 1-mana discount, and the fancy Vampire creature type. Now Vampire decks can rock this combo with a Vampire as the game ender!
To make this work, we need a sacrifice outlet. Viscera Seer is one of the best in the game so I’ve used this one above. Not to mention he’s also a Vampire! To get things started you’ll need Viscera Seer in play and Karmic Guide and Skymarch Bloodletter in the graveyard. From this point, you only need to play Reveillark and sacrifice it. Reveillark’s ability will trigger and you’ll target Karmic Guide, and Skymarch Bloodletter. When Karmic Guide enter the battlefield, you will target Reveillark with Karmic Guide’s “reanimate” ability. After Reveillark enters the battlefield, you can sacrifice both Karmic Guide and Skymarch Bloodletter – then sacrifice Reveillark to repeat the process, draining your opponent’s life one blood-sucking cycle at a time.
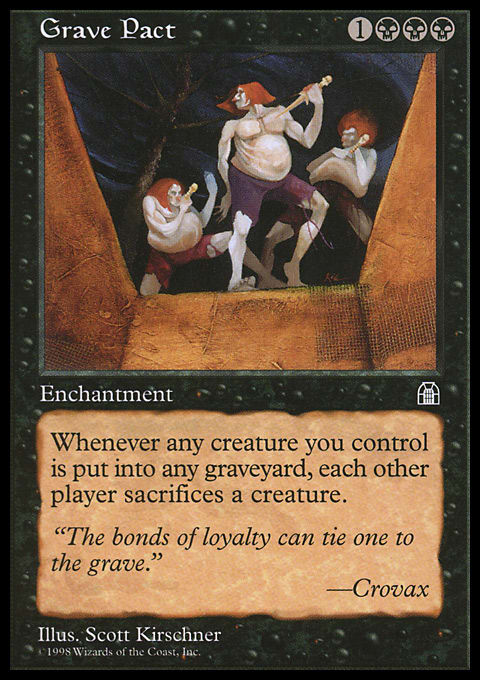
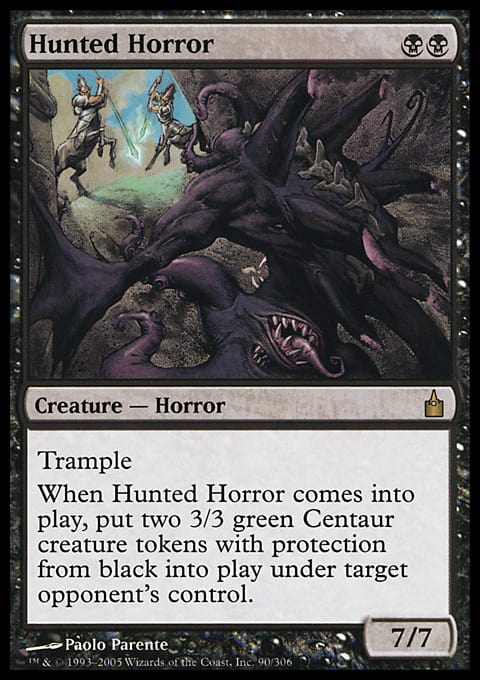
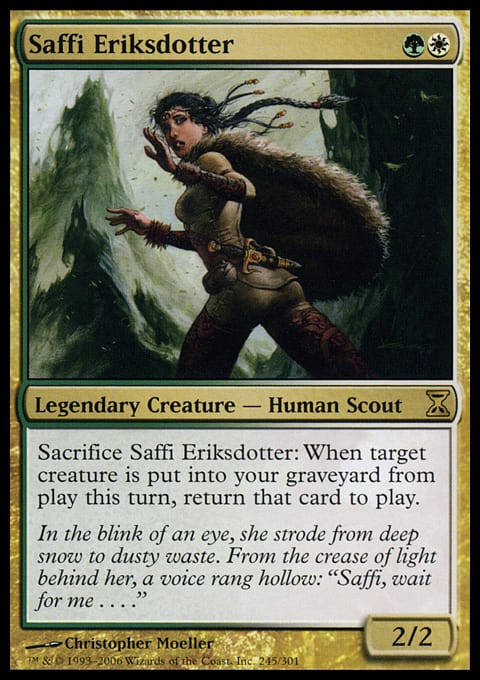
Revel in Riches + Grave Pact + Haunted Horror + Phyrexian Altar + Renegade Rallier + Saffi Eriksdotter + Karmic Guide + Reveillark
 |  |
 |  |  |
 | | |
Result: Get Rich, and Win the Game.
Key Rules Text:
At the beginning of your upkeep, if you control ten or more Treasures, you win the game.
Grave Pact — Whenever a creature you control dies, each other player sacrifices a creature.
Hunted Horror — When Hunted Horror enters the battlefield, target opponent creates two 3/3 green Centaur creature tokens with protection from black.
Phyrexian Altar — Sacrifice a creature: Add 1 mana of any color to your mana pool.
Renegade Rallier — Revolt — When Renegade Rallier enters the battlefield, if a permanent you controlled left the battlefield this turn, return target permanent card with converted mana cost 2 or less from your graveyard to the battlefield.
Saffi Eriksdotter — Sacrifice Saffi Eriksdotter: When target creature is put into your graveyard from the battlefield this turn, return that card to the battlefield.
Karmic Guide — When Karmic Guide enters the battlefield, return target creature card from your graveyard to the battlefield.
Reveillark — When Reveillark leaves the battlefield, return up to two target creature cards with power 2 or less from your graveyard to the battlefield.
Setup and Execution:
I like to end these articles with a convoluted "go-big" combo for your enjoyment. This is probably the one of the jankiest ones that I've ever stringed together, so enjoy. The goal is to give your opponent a bunch of creatures, then, make them sacrifice them, so that you can amass treasures from Revel in Riches. Believe it or not, it’s pretty difficult to give your opponent creatures in the game of Magic — let alone give them enough to generate the treasure needed to win with Revel in Riches! We’ll be using the card Hunted Horror to do this. At two-mana, Hunted Horror is conveniently costed for Renegade Rallier’s Revolt ability. However, we still have to find a way to repeatedly bring back the Rallier. For that we’ll go back to our friend Reveillark.
Reveillark cannot bring back Renegade Rallier with its own ability, but it can bring back Karmic Guide which can then bring back Renegade Rallier. I know! This is getting harry right!? Well, it’s not over yet, we still need to bring back the Reveillark! For that we’ll use Saffi Eriksdotter. Essentially, using Reveillark to bring back two creature who can reanimate other creatures. It sounds super complicated, but the cycle only three cards on the battlefield, one in your hand, and the rest can be in the graveyard. Specifically, you’ll need the Revel in Riches, Grave Pact, and Phyrexian Altar on the battlefield — with Reveillark in your hand. The rest of the creatures (Karmic Guide, Saffi Eriksdotter, Renegade Rallier, and Hunted Horror) need to be in your graveyard. I consider the creatures in the graveyard requirement a free-roll, since you can get creatures into the graveyard with minimal effort. Once the stage is set, you’ll start the cycle. Buckle your seatbelts!
(You’ll be using the ability on Phyrexian Altar to sacrifice creatures. This will gernerate a mana of your choice but it’s irrelevant for the combo.)
- Cast Reveillark, then sacrifice it.
- Bring back Karmic Guide and Saffi Eriksdotter.
- Sacrifice Saffi Eriksdotter using her ability targeting Karmic Guide.
- Sacrifice Karmic Guide, because of Saffi’s ability it will come back into play.
- Bring back Reveillark with Karmic Guide’s ability.
- Sacrifice Karmic Guide.
- Sacrifice Reveillark to bring back Karmic Guide, and Saffi Eriksdotter.
- Use Karmic Guide’s ability to bring back Renegade Rallier.
- Use Renegade Rallier’s ability to bring back Hunted Horror.
- Hunted Horror’s ability gives your opponent two 3/3 creatures.
This is where we can start the loop by repeating steps six through ten. The only difference is that you’d start each new cycle by sacrificing Saffi Eriksdotter targeting Reveillark then proceed to step six. While you’re looping, Grave Pact is cleaning up all the creatures from the board, and Revel in Riches is amassing a stockpile of treasure (as each of your opponent’s creature dies). We did it! With a pile of treasure, we pass the turn hoping to make it to our upkeep and claim victory! In the old days, we would use something like Privileged Position, or Isochron Scepter and Orim's Chant to hedge against nefarious plans. Today, we have this beauty to help us get to the other side.
Conclusion
I typically try to get these articles out on release week, so I apologize for the delay. I had to hit some project deadlines for the game that I’m designing. I may share more on that later. Until then, I hope these combos bring you much joy while playing with the new toys from Ixalan. As always, I’d love to hear about some of your favorite combos from Ixalan in the comments section. Let’s hit the shout-outs and wrap up for the week.
Shout-Outs
Friends & Play-testers — I really appreciate a handful of my friends taking some time to play-test the project that I’m working on. Thank you Adam Olds, Ben Weinburg, and Nick Lutes! We had helpful play-test sessions, and of course we had a little time left over to jam some Commander Battlebox!
Chris Lansdell — Chris, being a level 3 judge, was gracious enough to check my last article for card interaction correctness. Check out his column on Star City Games. Thanks Chris, you rock!
<3 Jonathan